

Storage solutions are an important component of modern software development. We need storage solutions for different purposes such as data storage, data archiving, data processing and analytics, web application hosting etc. AWS S3 is one of the widely used storage solutions which is used by many applications across the globe. Today we will look at how we can configure AWS S3 and upload/download files with Spring Boot.
S3 Concepts
Below are some concepts related to AWS S3
Buckets
Any data that we intend to store in S3 is stored in the bucket. A bucket is like a container that holds every data in our S3. A few points to note about buckets are:
S3 is a global service but the buckets are defined at the region level.
The name of the bucket must be globally unique.
There are some naming conventions as well that you have to keep in mind while defining a S3 bucket.
Objects
The data stored in the S3 is called an object. Every object is assigned a key by which we can access that object.
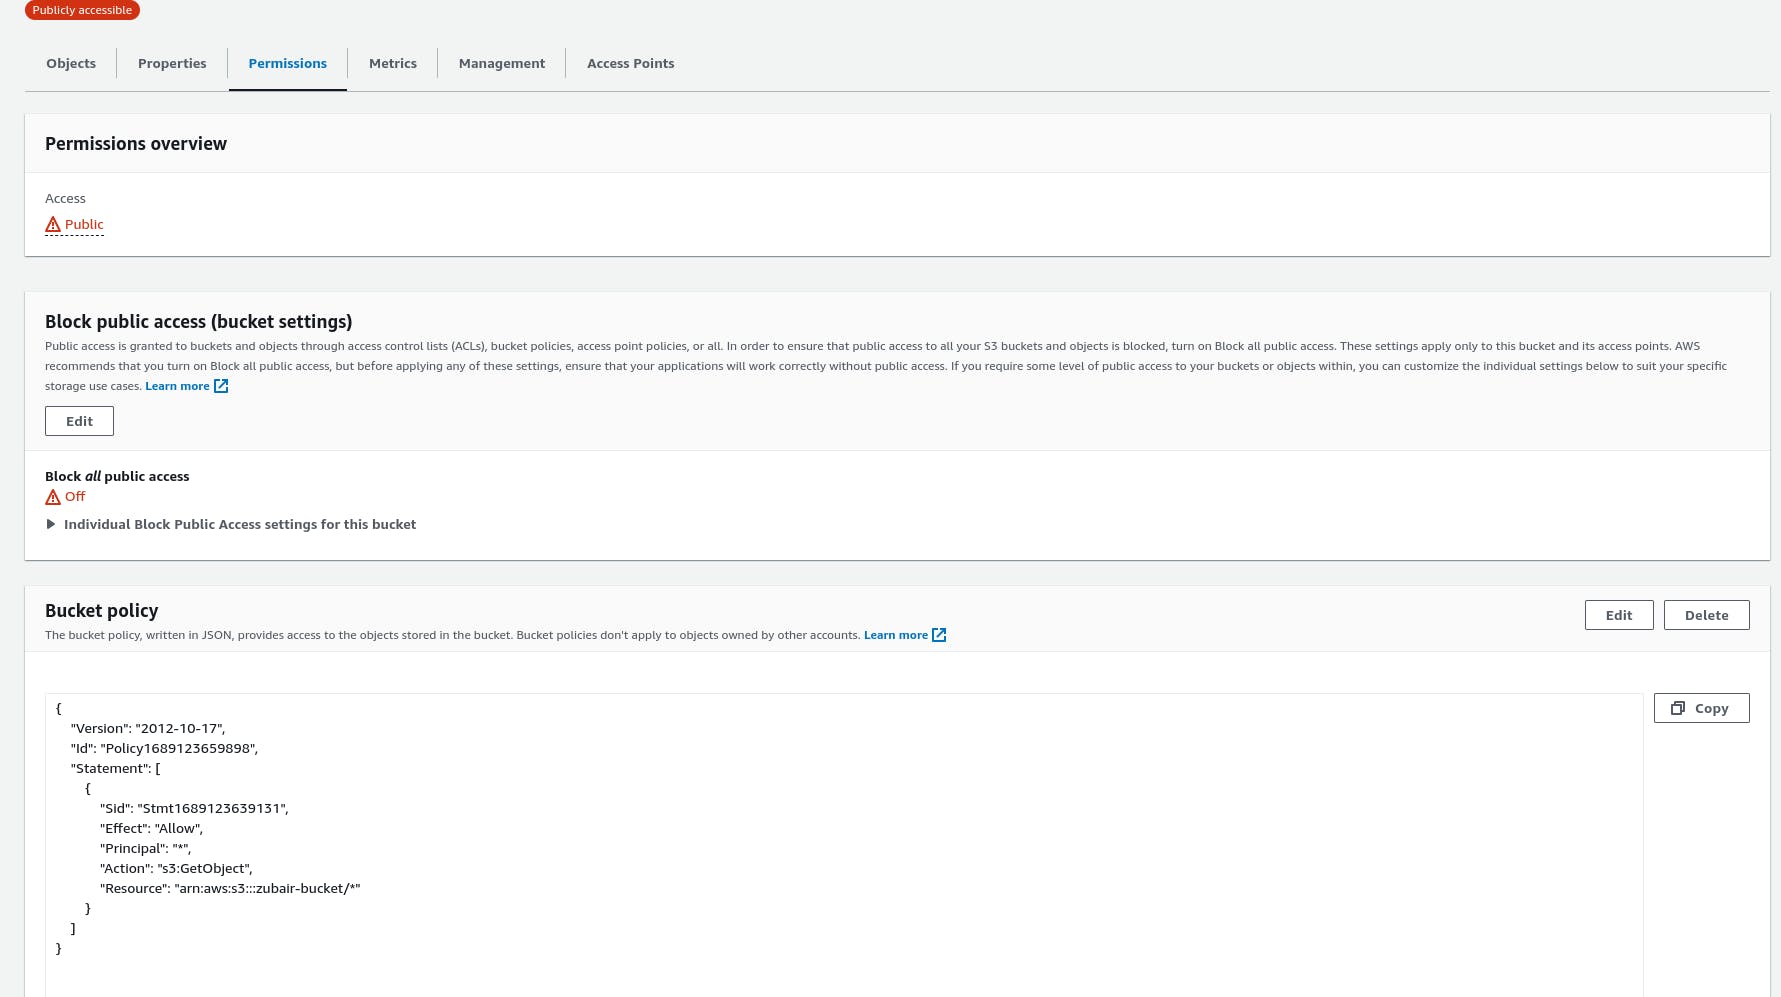
Policies
To make sure that our bucket is accessed securely and there is no security breach, we have to define policies on our bucket. There are different types of policies described below:
Bucket Policy >> For public access, it can be applied to selected or every object.
IAM Policy >> Allow access to IAM users
We have to provide the policy as JSON. For this, we are provided with some example policies as well as a policy generator on the AWS console. Below is a sample JSON policy document that allows the public get access to every object in the bucket.
{
    "Version": "2012-10-17",
    "Id": "Policy1689123659898",
    "Statement": [
        {
            "Sid": "Stmt1689123639131",
            "Effect": "Allow",
            "Principal": "*",
            "Action": "s3:GetObject",
            "Resource": "arn:aws:s3:::zubair-bucket/*"
        }
    ]
}
Pricing
Pricing of AWS S3 depends on the class that you choose for the object being stored. Below are some classes with their description and price range.
| Class | Price | Retrieval Duration | Description |
| Standard | Low | Fast | For frequently accessed data |
| Infrequent Access | Low | Low | Data that is accessed infrequently |
| Intelligent Tiering | High | Moderate to Fast | Automatically decides the class of the object based on the usage |
| S3 Glacier | Low | Low | Used for data archive |
For more reading on the S3 storage classes you can read: S3 Storage Classes
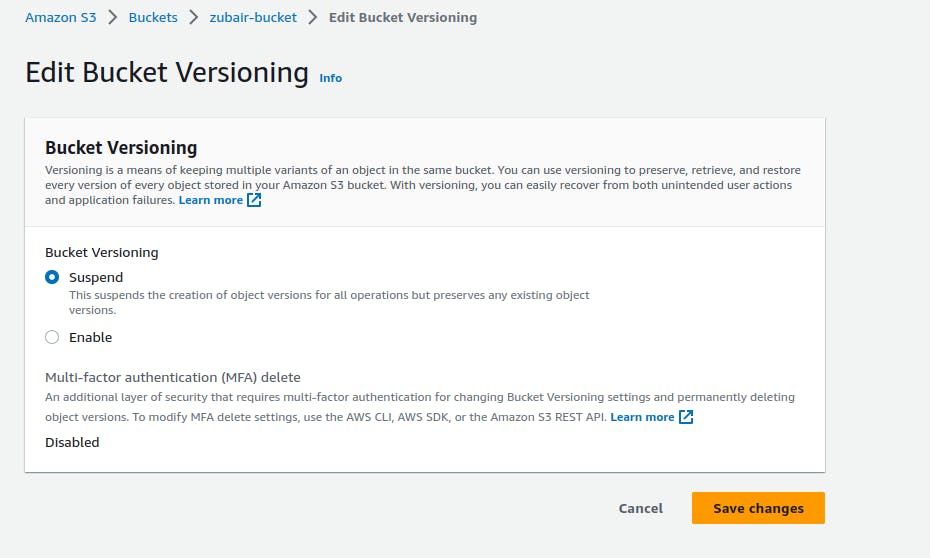
Versioning
We can version the objects in AWS S3. Versioning works like same as other versioning mechanisms. For every next upload of the same object, a new version of the same object is stored with the previous version stored as well. We can roll back to the previous version when needed. We can enable/disable bucket versioning by going to the properties section.
Setting up a Bucket
Setting up a bucket is very simple, given the ease of navigation on the AWS console. Below is the step-by-step guide on how to set up an AWS S3 Bucket:
Navigate to the Amazon S3 menu.
Go to the 'Create bucket' option.
Provide a globally unique bucket name.
Select the desired region.
Check/Uncheck 'Block all public access' as desired.
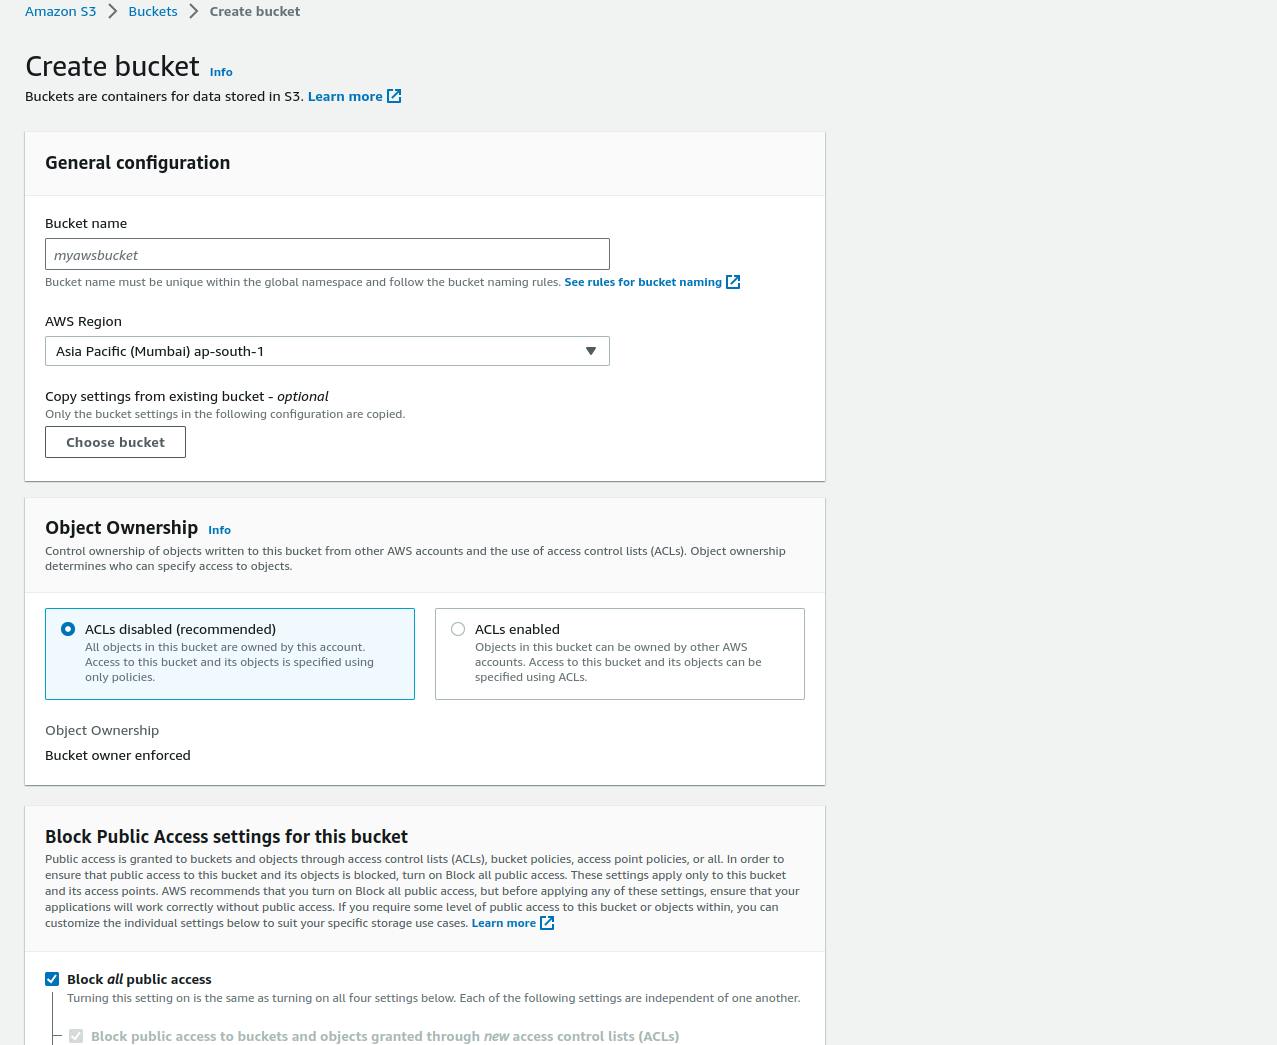
You can select the 'Bucket Versioning' feature at this time.
Leave the rest of the setting as default.
Once the bucket is created, navigate to the 'Permissions' menu and add a bucket policy.
Uploading files using Spring Boot
Now it's time to upload objects to our newly created S3 bucket. For this let us go through each step.
Creating a Spring Project
We need to create a spring application to demonstrate uploading the objects to S3 bucket. For this create a new Spring Application with spring web as a dependency. You can create the project from Spring Initializer or from Spring tool suite.
Adding the dependencies
AWS provides the SDK in almost every language which simplifies the development of applications using AWS resources. We can add the dependency for the whole SDK or for each individual service. The latter is recommended usually. Let us add the dependency for AWS S3.
 <dependencyManagement>
         <dependencies>
             <dependency>
                 <groupId>software.amazon.awssdk</groupId>
                 <artifactId>bom</artifactId>
                 <version>2.20.102</version>
                 <type>pom</type>
                 <scope>import</scope>
             </dependency>
         </dependencies>
     </dependencyManagement>

     <dependency>
             <groupId>software.amazon.awssdk</groupId>
             <artifactId>s3</artifactId>
     </dependency>
The Dependency Management section is added here to automatically manage each module version. We can go ahead without this as we are only using a single module of AWS.
For more please visit the AWS SDK for Java documentation.
Configuration
 @Configuration
 public class Config {
     @Value("${aws.accessKeyId}")
     private String accessKey;

     @Value("${aws.secretKey}")
     private String secretKey;

     @Value("${aws.region}")
     private String region;

     @Bean
     public S3Client s3Client() {
         return S3Client.builder()
                 .region(Region.of(region))
                 .credentialsProvider(StaticCredentialsProvider.create(AwsBasicCredentials.create(accessKey, secretKey)))
                 .build();
     }
 }
We need to create the bean of the S3Client which is responsible to communicate with the AWS resources and do all the other stuff. The values will be fetched from the application properties specified in the project.
 aws.accessKeyId=<Your User's Acess Key>
 aws.secretKey=<Private secret key for access key>
 aws.region=<S3 Bucket region>
You have to mention your user's access key and the private access key for it. You can create a new access key from the IAM User menu and use those credentials here in case you have lost the previous key. The last thing is the AWS region in which you have created the S3 bucket.
Controller & Service
 @RestController
 @RequestMapping("/files")
 public class FileUpload {
     private FileUploadService fileUploadService;

     public FileUpload(FileUploadService fileUploadService) {
         this.fileUploadService = fileUploadService;
     }

     @PostMapping("/upload")
     public ResponseEntity<Object> uploadFile(@RequestParam("file") MultipartFile file) {
         return this.fileUploadService.uploadFile(file);
     }
 }
The controller specifies the uploadFile method with the /upload endpoint. It takes MultipartFile as the input parameter, which is Spring's interface for files. It then calls the uploadFile method of the FileUploadService with the file argument.
 @Service
 @Slf4j
 public class FileUploadService {

     private S3Client s3Client;
     private final String bucketName = "zubair-bucket";

     @Autowired
     public FileUploadService(S3Client s3Client) {
         this.s3Client = s3Client;
     }

     /**
      * Method to upload file to S3 bucket.
      *
      * @param file the file.
      * @return response
      */
     public ResponseEntity<Object> uploadFile(MultipartFile file) {
         try {
             // to identify the object uniquely.
             String key = UUID.randomUUID().toString() + "-" + file.getOriginalFilename();

             // Upload the file to S3 bucket
             s3Client.putObject(PutObjectRequest.builder()
                     .bucket(bucketName)
                     .key(key)
                     .build(), RequestBody.fromInputStream(file.getInputStream(), file.getSize()));

             String message = "File uploaded successfully!";
             return new ResponseEntity<>(message, HttpStatus.OK);

         } catch (IOException exception) {
             String message = "Exception occured while uploading the file";
             log.error(message);
             return new ResponseEntity<>(message, HttpStatus.BAD_REQUEST);
         }
     }
 }
The service does all the rest of the work. It is provided with the S3Client object which we defined in the configuration earlier. We are creating a unique key in order to identify the objects uniquely. The S3Client is then uploading the object using putObject method.
Testing the API
To test the API we will call the endpoint using PostMan.
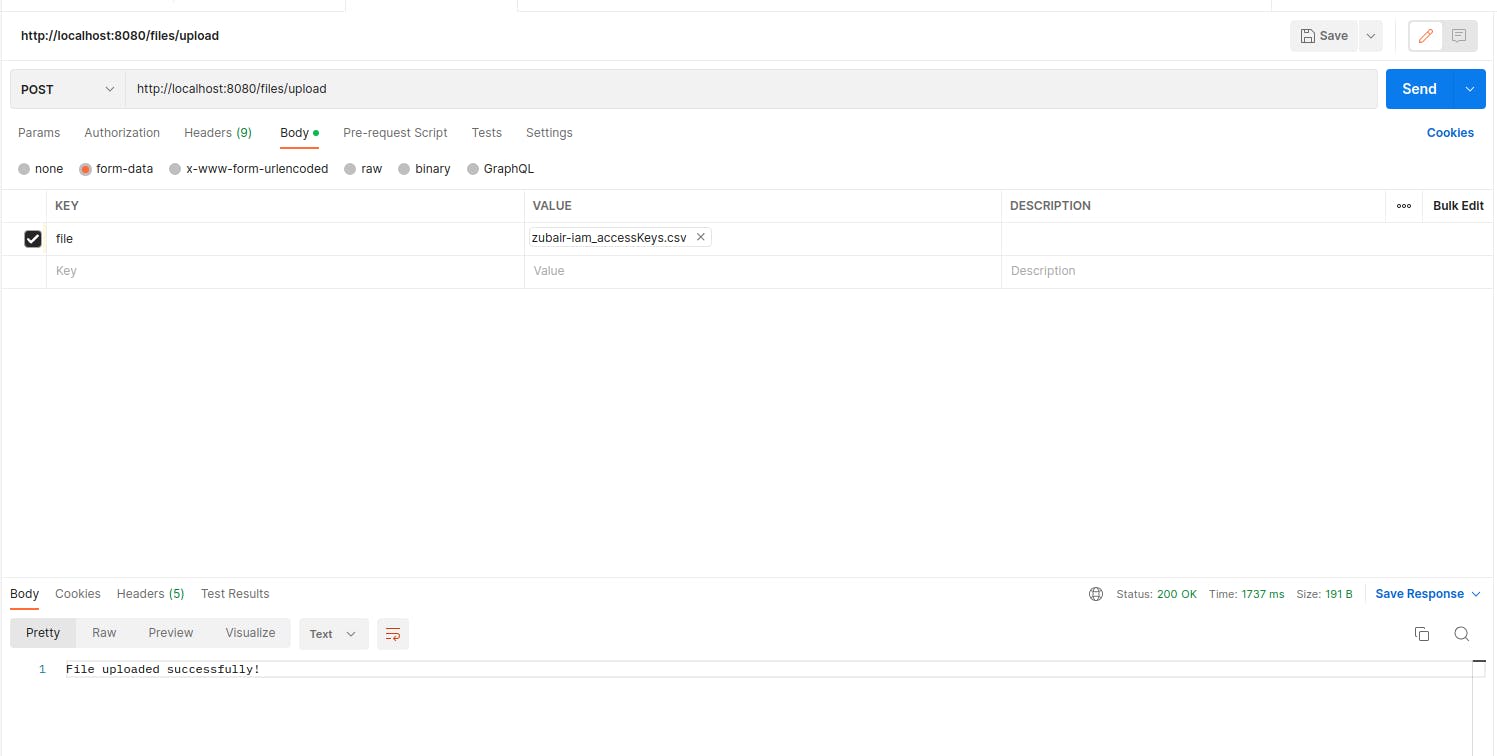
We have received success response from the API on a POST call. Let us check if the file is reflected on the S3 Bucket console or not.
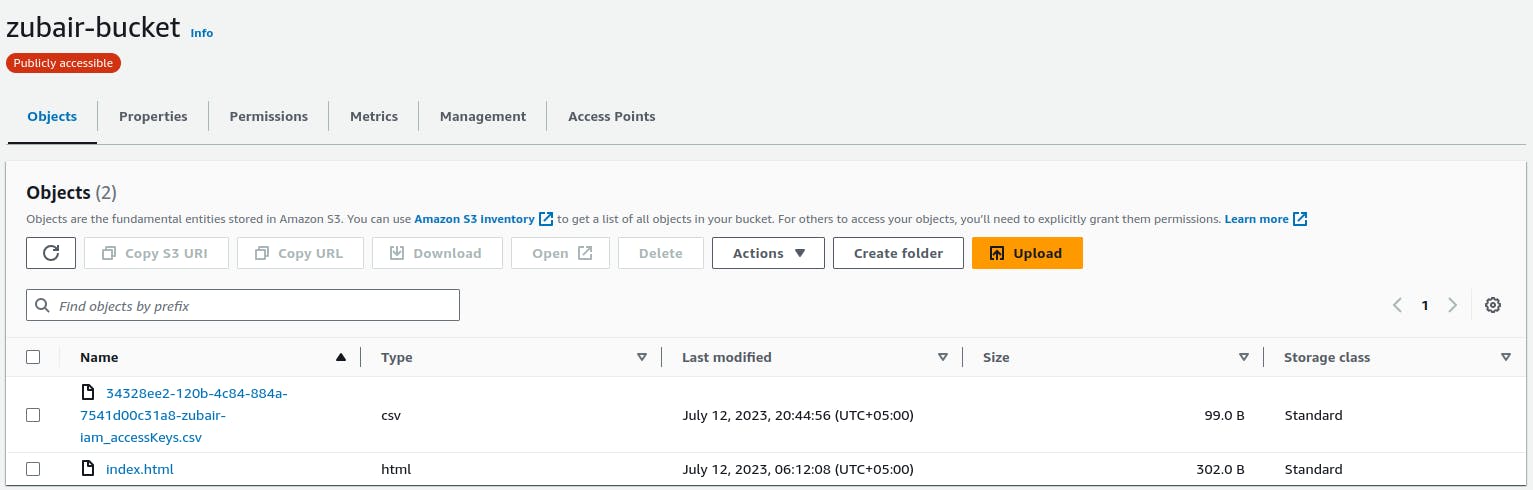
You can see that we have the file uploaded to our S3 bucket with the unique id prepended to it.
Conclusion
This is it for the AWS S3 with Java Spring Boot where we went through the general idea of S3 and then we also configured a S3 Bucket. Finally, we used the AWS SDK to upload files to our bucket using Spring Boot. Go ahead and try to make it work for downloading the files from the bucket.
For the complete code, you can visit the repository below. Please keep in mind to add your AWS credentials in the properties file.