


Have you ever been into a problem where the application just gets messed up after refactoring or making some changes to the code? Well, this is exactly what happens if the unit tests coverage for the application is not there. I also did not care about writing the unit tests earlier until I came across the advantages and the surety it gives you that the functionality is working or won't be wrong if I say will work in the future after any changes as this is the major purpose of writing unit tests to make sure that the intended functionality is right there if there are any changes made in the future.
Without any ado let's look at writing unit tests with one of the most popular and powerful frameworks that give you some amazing built-in methods for writing the test cases.
Junit
To make sure the code is not broken and works fine, there is a very powerful open-source framework 'Junit' which provides a lot of functionality to write the test cases in Java, which was first released in 1998. Want to hear an interesting fact? It was created or the idea came into existence on a flight from Zurich to Atlanta by Kent Beck and Erich Gamma in 1997. Thanks to them that we have an amazing framework to write tests today.
Versions
Junit 3 - has its own minor versions.
Junit 4 - has its own minor versions.
Junit 5 - The latest release that also has its own minor versions.
Junit 5 Architecture
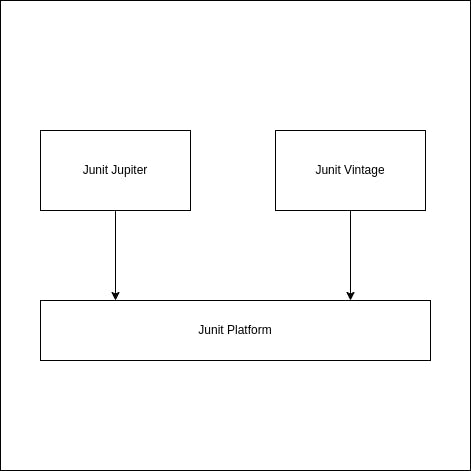
Juntit 5 architecture consists of 3 major parts that are illustrated in the above architectural diagram. Below is a detailed description of each component.
Junit Jupiter - Junit Jupiter is the testing engine that provides the new annotations, assertions and support for writing and running the unit tests with JUnit 5.
Junit Vintage - As the term vintage sounds, Junit vintage is there to provide backward compatibility to run the tests with Junti 4, and Junit 3.
Junit Platform - It is the core element of the Junit architecture that provides the support to run the tests on JVM. It is like the middleware between the testing framework and the IDE.
For more, you can explore the Junit official documentation to get detailed insights.
Working
So the basic idea is to verify and make sure that all the cases in our code execute and work fine. For this the approach is simple, we divide the test into 3 sections. The first one is the given section which includes the statements that can be the required values, variables, parameters, and dependencies and then we have the when section of statements, which indicates the scenario under a specific condition, It can be the call to the desired method which we want to test. At the end we have the then section of statement(s) which are the outcome of the code in the when section. It includes the assertions or verifications that we want our tests to make sure of.
We can summarize this as follows:
Given - The provided values and dependencies. It can include the mocking of the values (we will see what mocking is later)
When - The call to the methods that are to be tested
Then - The required actions that need to be performed. It includes assertions(as the name suggests, it is the affirmation or the condition that we need to be true. e will see the detail later) and mocking.
Annotations
Following are some annotations that we can use with JUnit:
| @Test | To mark the method as a test. |
| @Ignores | To ignore the test from execution. |
| @BeforeEach | Method marked with this annotation will be executed before each test. |
| @AfterEach | Method marked with this annotation will be executed after each test. |
| @BeforeClass | Method marked with this annotation will be executed before all tests. |
| @AfterClass | Method marked with this annotation will be executed after all tests. |
Assertion
As the name suggests it is a sort of declaration or affirmation we make about our code or methods that we expect to be true. Junit provides its own assertions methods while we can use some other libraries, the most used one of all is 'AssertJ'. Let us look at some assertion methods below.
| assertTrue(boolean) | Verifies that if a boolean condition provided is true |
| assertThat(Actual).equals(Expected) | Verifies if the provided actual value is equal to the expected |
| assertEquals(Actual value, Expected Value) | Similar to the assert that method, it also verifies if the actual and expected are equal or not. |
| assertFalse(boolean) | Verifies that the provided condition is false |
| assertThatThrownBy(Throwable call).isInstanceOf(Class) | Verifies that the invokation to a method which throws an error is instance of the provided class. We can append more assertions to this method. |
The following import is required for assetj assertions:
import static org.assertj.core.api.Assertions
Mocking
So mocking is basically the process of creating a mock behavior or stubbing the behavior in order to test the interaction of our actual method with it. Sometimes we require some complex objects to be passed to our method, or often times we have a dependency on another class or repository which we have already tested. So in these sorts of cases, we basically mock the behavior of that object, Class, or repository. We usually tell the JVM, hey listen! these mocks are tested and trusted, just take them as it is and use them wherever you require them to carry out the current execution.
We use Mockito framework in order to make use of these mocks. Following are some methods and annotations from the framework:
| @Mock | A dummy instance is created for the dependency or the class defined with this annotation. It is used normally with the repositories and other classes for which we do not want to interact with real objects. |
| when(class.someMethod).thenReturn("mock") | This is used to get a dummy value/ or a mock whenever the specified code block is executed |
| given(call to some method).willReturn(some value) | This also works the same way the above method works. |
| verify(instance, no of times ).methodName() | This verifies that the specified method of the instance is invoked the number of times specified. |
Hands-On
Now that we have gone through some basic concepts of unit testing with junit and mockito, it's time to get our hands dirty with some practical work. We will try to apply some concepts discussed above with an example below.
Before we start, let us look into the dependencies required to start working with Junit. If you are working with Spring Boot then only the dependency described below is required as it bootstraps everything else for us.
    <dependency>
            <groupId>org.springframework.boot</groupId>
            <artifactId>spring-boot-starter-test</artifactId>
            <scope>test</scope>
        </dependency>
This will include all the required libraries for Junit and mockito. If you are not using Spring boot then you have to add the dependencies separately as below:
<dependency>
    <groupId>org.junit.jupiter</groupId>
    <artifactId>junit-jupiter-engine</artifactId>
    <scope>test</scope>
</dependency>
<dependency>
    <groupId>org.junit.platform</groupId>
    <artifactId>junit-platform-runner</artifactId>
    <scope>test</scope>
</dependency>
<dependency>
        <groupId>org.mockito</groupId>
        <artifactId>mockito-all</artifactId>
        <scope>test</scope>
</dependency>
After adding dependency you can navigate to your class file in the IDE and hover anywhere, right-click and select generate\>test, a prompt will pop up to select the methods of the class against which you want to write the tests. This way you can create the test file with the code to write in the test directory. Alternatively, please note that the package structure for the test classes are same as that of the class package, so you can just manually create the test class as well.
Let us begin with the sample code
package com.spring.dmeo.service;

import com.spring.demo.model.Employee;
import com.spring.dmeo.repository.EmployeeRepository;
import org.springframework.beans.factory.annotation.Autowired;

public class EmployeeService {
    private EmployeeRepository employeeRepository;

    @Autowired
    public EmployeeService(EmployeeRepository employeeRepository) {
        this.employeeRepository = employeeRepository;
    }

    public void addEmployee(Employee employee) {
        boolean existsById = employeeRepository.existsById(employee.getId());

        if (existsById) {
            throw new IllegalStateException("Employee already exists");
        }
        employeeRepository.save(employee);
    }

}
The code above is a simple class having a method that takes an employee and tries to store it in the repository. Remember that while writing a test, we try to cover every possible case of that method. So here as well we will write the test which will cover both cases, one in which the employee is saved successfully and the one in which the employee is already there and we are returned with an exception.
package com.spring.demo.service;

import com.spring.demo.model.Employee;
import com.spring.demo.repository.EmployeeRepository;
import org.junit.jupiter.api.AfterEach;
import org.junit.jupiter.api.BeforeEach;
import org.junit.jupiter.api.Test;
import org.junit.jupiter.api.extension.ExtendWith;
import org.mockito.ArgumentCaptor;
import org.mockito.Mock;
import org.mockito.junit.jupiter.MockitoExtension;

import static org.assertj.core.api.Assertions.assertThatThrownBy;
import static org.assertj.core.api.AssertionsForClassTypes.assertThat;
import static org.assertj.core.api.AssertionsForClassTypes.assertThatNoException;
import static org.mockito.Mockito.never;
import static org.mockito.Mockito.verify;


@ExtendWith(MockitoExtension.class) // required to work with Mockito
class EmployeeServiceTest {

    @Mock
    private EmployeeRepository employeeRepository;
    private EmployeeService employeeService;

    @BeforeEach
    void setUp() {
        employeeService = new EmployeeService(employeeRepository);
    }

    @Test
    void test_addEmployee_WithSuccess() {
        //given
        Employee employee1 = new Employee(
                "Employee",
                "One",
                3);

        //when
        employeeService.addEmployee(employee1);

        //then
        ArgumentCaptor<Employee> employeeArgumentCaptor = ArgumentCaptor.forClass(Employee.class);
        verify(employeeRepository).save(employeeArgumentCaptor.capture());
        Employee value = employeeArgumentCaptor.getValue();
        assertThat(value).isEqualTo(employee1);
        assertThatNoException();
    }

    @Test
    void test_addEmployee_Fails() {
        //given
        Employee employee1 = new Employee(
                "Employee",
                "One",
                3);
        String errorMessage = "Employee already exists";

        //when
        employeeService.addEmployee(employee1);

        //then
        verify(employeeRepository, never()).save(employeeArgumentCaptor.capture());
        assertThatThrownBy(() -> employeeService.addEmployee(employee1)).isInstanceOf(IllegalStateException.class)
                .hasMessage(errorMessage);    }
}
Please pay close attention to the code, we have defined the dependency of the employeeRepository with @Mock, this is because we want junit to mock the instance of the repository for us because for obvious reasons we do not want to do the tests using the real instance of the repository in the production environment. Also please note that for repositories normally, we do not test them, as we rely on the providers that already have tested all of the functionality. However, if we have defined our own method(s) in the repository then we test the repo as well.
In our first test 'test_addEmployee_WithSuccess()', we have created an instance for an employee and have passed it to the 'addEmployee'. Now to test its successful execution we are doing the following things.
ArgumentCaptor<Employee> employeeArgumentCaptor - This will capture the passed value of the employee to the repository. By doing this we can later match this value to the original value of the employee.
Verify() - Next we called the Mockito method to verify that there should be a single interaction at least with the repository instance using the save() method.
assertThat(value).isEqualTo(Employee1) - Now we have used the argumentCaptor value to match it with the original value.
assertThatNoExcetion() - Finally we have verified that there should be no exception if the method is to be executed successfully.
Using all other methods, we are making sure that the 'addEmployee' method is working fine with the success case.
Now if we look at the other case of 'test_addEmployee_Fails()' in which the employee already exists and the code should return us an exception, we are doing the following:
verify(employeeRepository, never()).save(employeeArgumentCaptor.capture()) - It is obvious that there will be no interaction with the repository when the failure scenario executes. This is what we are verifying here with the use of verify() from mockito.
assertThatThrownBy(() -> employeeService.addEmployee(employee1)).isInstanceOf(IllegalStateException.class) .hasMessage(errorMessage) - Now here, as we know that the method will throw an exception we are just making sure that the exception returned is of the expected type and the message is also the correct one.
Other Testing Frameworks
Jest
Mocha
Cypress
Testcafe
Final Thoughts
We have seen the features and benefits of unit testing with Junit. In order to make the application robust and to avoid any issues after making the changes, unit test coverage plays a vital role. This was all for unit testing with Junit, for more details you can visit the official documentation of junit. See you next time around :)